I have been a fan of Anthony Bourdain since I read "Kitchen Confidential". He actually wrote the forward to this book, and has been talking about this concept in his books and on his television show, No Reservations, for years. His last meal caught my eye, as did many of the meals in the book. He chose a dish that is served at St. John in London. It is a restaurant owned by Fergus Henderson, another chef featured in the book.
The dish is Roast bone marrow with parsely salad. Bourdain recently highlighted this dish on his Holiday episode of No Reservations. I got inspired the next day at work when I realized that all of our marrow bones go into the rendering barrell (waste). I asked Jeff, my boss, if I could take a few of them home for cooking and he gladly cut me a few and vacuum packed them for me! The recipe and pics of my version of Bourdain's last supper are below:
Roast bone marrow with parsely salad:
What you need:
2.5" beef marrow bones (I roasted 3 and it was a great portion for me)
1/2 shallot finely chopped
small amount of rough-chopped flat-leaf parsley
1 tablespoon olive oil
pinch of sea salt
french bread cut into 3 smaller pieces for thin toast
 **the original recipe calls for capers and fresh squeezed lemon, but I ommitted them to get the full flavor of the marrow
How to make it:
1. Preheat oven to 400 degrees.
2. Place marrow bones in oven dish or baking sheet, etc.
3. Bake marrow bones for about 17 minutes.
4. While bones are roasting, mix the parsley, shallot, sea salt and olive oil in a small bowl and mix with fingers until all is coated with oil.
 5. With about 7 minutes left on the roasting, place the slices of bread in the oven to toast.
6. Remove bones and toast after 17 minutes is up. ***(Keep an eye on the bones to make sure the marrow is not liquifying and turning into oil on the pan. This may take some experimentation with time and heat. The marrow should be custardy and soft, but not liquid)

 7. Let bones sit for a couple of minutes to finish cooking.
8. Use a small utensil to remove the brown/red/gray marrow from the bones and spread onto bread.

9. Salt the marrow lightly on the bread, and top with parsley salad
 10. Enjoy!
****Marrow has officially jumped oysters to join my top 2 flavors of all time. I still think, pound-for-pound, bacon is the best flavor out there.
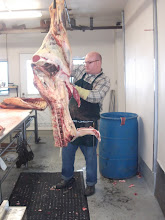
 After I sharpened my knife, and started using my steel correctly, my job got a lot easier, obviously. It was like my knife was moving through butter. Because of this breakthrough, we were able to finish 5 whole beefs on Wed., Thur. and Friday. It made an instant difference on my speed of work and on the pain in my hands. I am still a little apprehensive when using the track system to move beef around above me, but I am getting more confident by the day. The thought of a 300 lb. half of beef falling on me is not pleasant.
 The eggs are from a friend of my co-worker Joanne. Her friend raises chickens in Elgin, OR. The green eggs are from a breed of chicken called Americauna, sometimes called the Easter Egg chicken. Not only was the color of the eggs different, but the color of the yolk and the flavor were both much more intense than regular grocery store eggs. I will be requesting more.